Friday, August 30, 2019

Prairie Shack - Tracing, Ink & Paint

I found this image of a shack and thought it looked like something interesting to paint.  I started by modifying the image in Gimp to create a black & white outline of the image that I can trace.

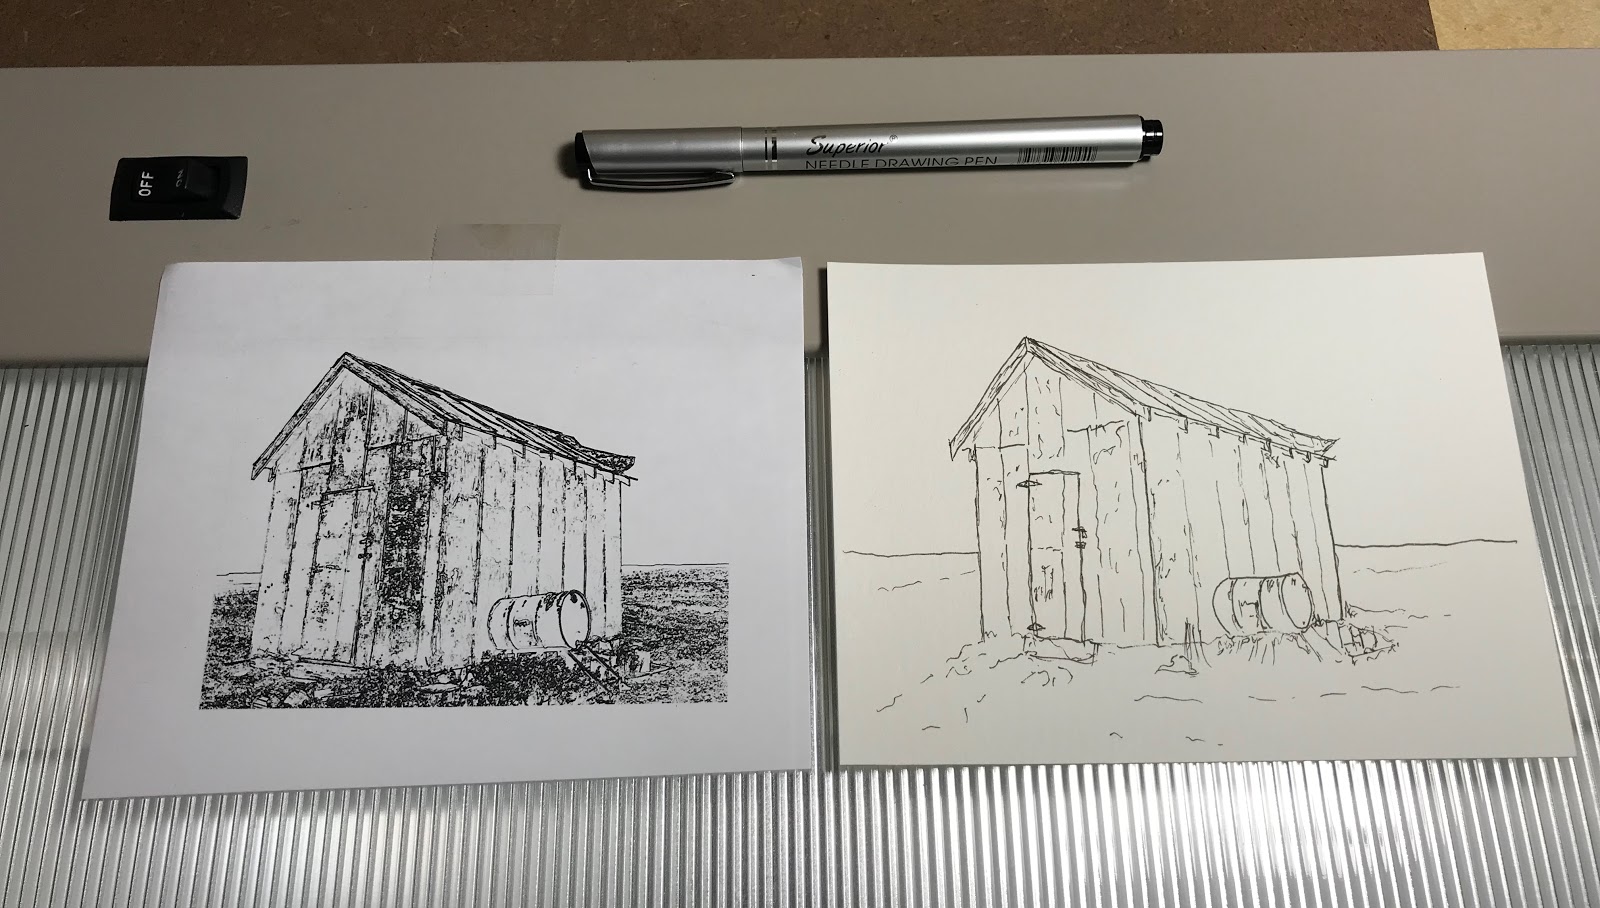
Here is the image prior to tracing.

I have now traced the image and inked it out.

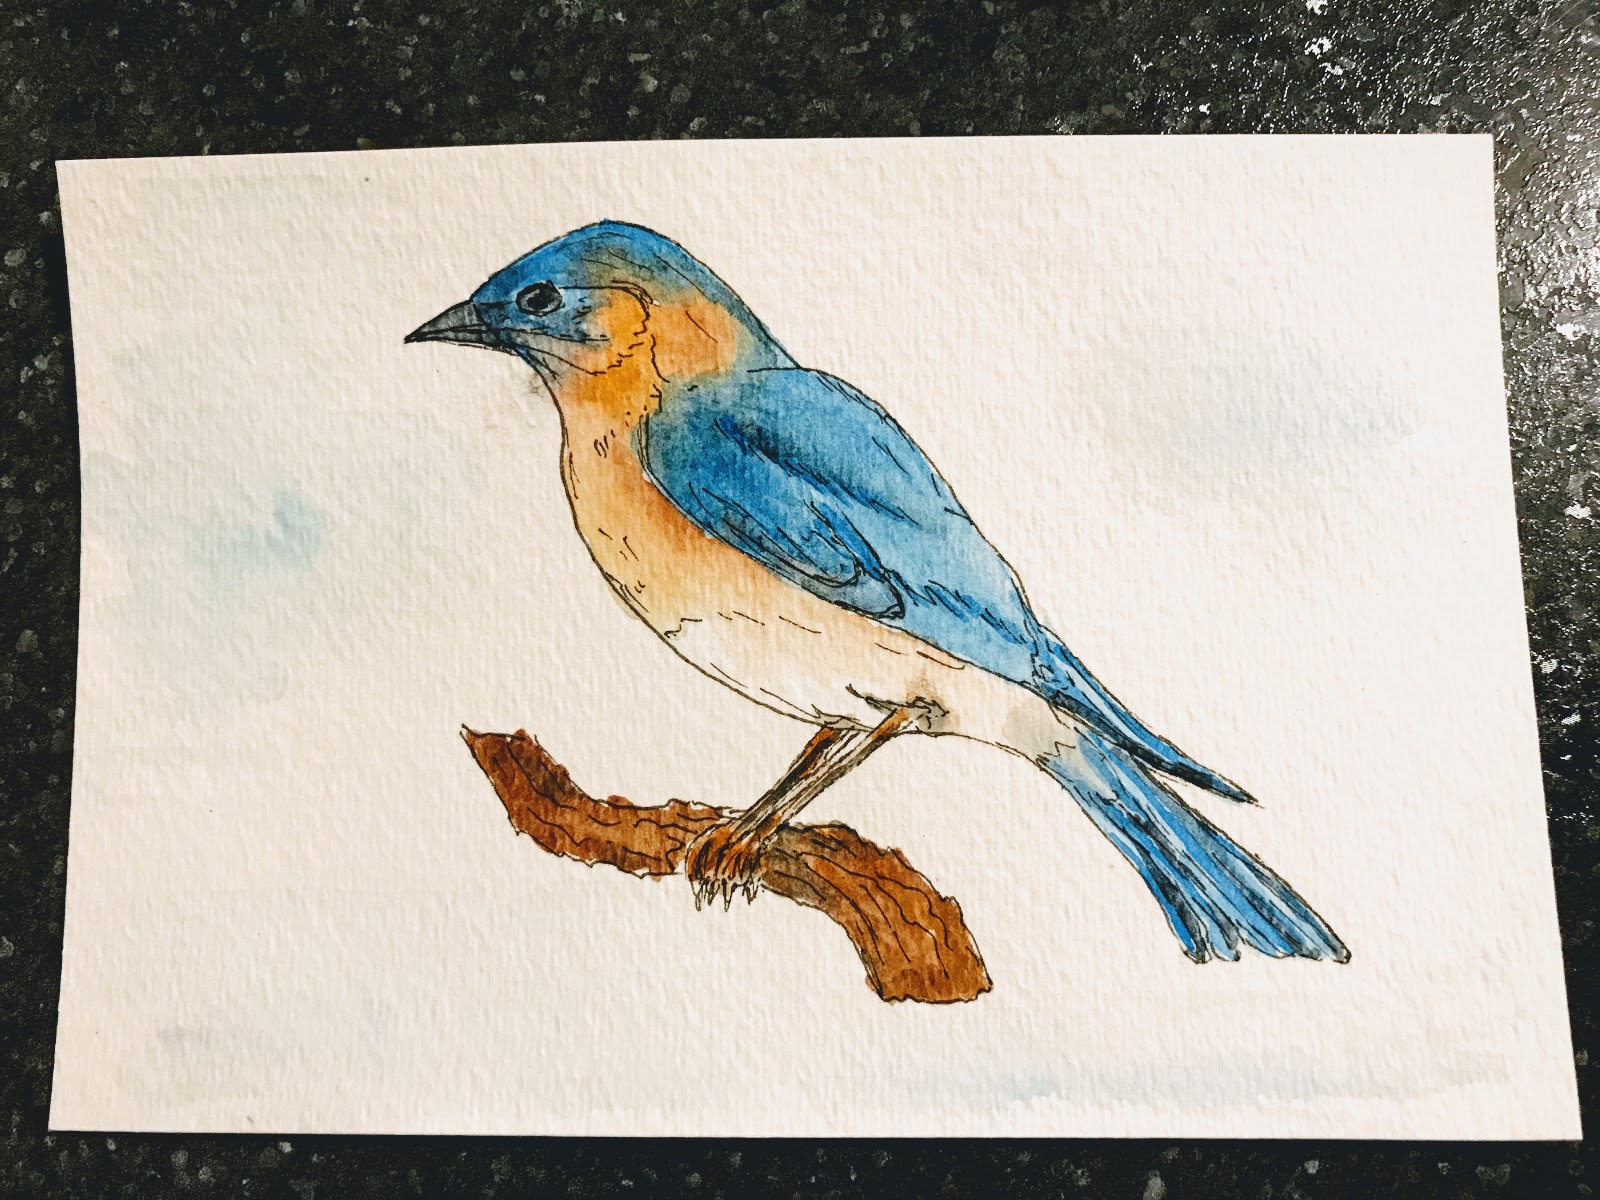
Now the fun part, when I paint the image.  Here is the finished product below.  I really like how it turned out in the end.  I call it, Prairie Shack.


The last thing I did was took the image and converted it to a black and white image, as I think it gives it a unique look.


Below are the supplies I used, along with the printout, and the finished painting.  I have a Sakura Koi 24 pot watercolor kit that has become my go to supplies recently.  I used a #8 Round brush for most of the details.  I highly recommend the Sakura Koi kit, and I'll post a link to the kit here below.  It provides deep vibrant colors, and in another post, I'll do a full review on the kit, show some of its features and how the colors look on a pallet I created.


Click Below to go to the Field Sketch Kit by Sakura.


Thursday, August 29, 2019

Cardinal

I had a picture of a cardinal I had found and was working with some digital enhancement filters and features within Gimp, a free software similar to Photoshop.  I was able to make some pretty cool adjustments to the photo, I hope you enjoy the variations.

This one has some B&W Screens and Overlays to it, and still fairly closely represents the original image, which was pretty flat with a dull washed out background.


This one adds some lines and layers to it.  This one is probably my favorite as it looks like a really well inked and watercolored photo.


This last one tried out some other features and background filters and brought out much more of the red from the bird, as well as more focus on the outline of the bird.


There are quite a few cool layers tricks and modifications you can do to images using Gimp, I highly recommend it as it is very powerful for a free software.

My Painting Workspace

Having a nice, fairly organized workspace is very helpful when painting.  We did some home renovations and had an extra set of cabinetry and I turned that into a nice workspace for my painting.  It is mostly setup for painting miniatures, but has plenty of space for other crafts/painting as well.  It is a bit messy at the moment, but here is the picture of it.

There's quite a bit here, So I'll walk you through it.
1. I have an old set of cabinetry as the base, with an old laminate top and 4 drawers on each side, which is very handy for craft supply storage.  Underneath the cabinet, which is a bit hard to see is my compressor for my airbrush, and a Powerstrip I attached to the cabinet that everything plugs into.
2. The pegboard along the back wall is set off they wall by some 1x2 boards, which allows for the peg hooks to be installed.  Prior to installing the pegboard I screwed in the two small 1x2's as shelves for my paints.
3. Floating Shelf.  Just above the pegboard, I installed a floating shelf, so there are a bunch of supplies up on the shelf just out of the picture.
4. Lighting. I installed some undershelf lights on the floating shelf, as well as another desk lamp.  This provides plenty of lighting for anything I'm working on.
5. Supplies, I have all my Vallejo paints lined up in order, as well as some other supplies on the desktop, paints, brushes, etc...
6. Lastly, you have to have the stuffed fish on the wall to oversee all that is good.

This is just a brief glimpse of where I do some of my work.

Rob

Wednesday, August 28, 2019

Alcohol Ink, first picture

So a few weeks ago, I went to an art festival and saw some really cool works in Alcohol Ink and figured that it looked interesting as a medium to work in.

I went out and purchased a starter kit, some paper and a few other inks to get started and just started splashing some ink on a 4" x 6" piece of small paper.

I thought I'd stick to some yellow, green, blue and gold.  Here's the picture:


The brand of inks I purchased made drips quite a bit larger than I though and people weren't kidding when they said the ink dried fast.  The problem in my picture came with the gold, it came out pretty fast and ended up being more than I had wanted.

Oh well, I'll definitely have to play more with the techniques, and I love the abstract nature of the art, but for a first piece, this wasn't too bad.

Below is the kit I purchased.  I haven't really used it much yet, and I frankly have nothing to compare it to, so as of yet I'll withhold my opinion or a review.

Monday, August 26, 2019

Abstract Watercolor

Recently, a family member got me a small easel, as they knew I had started painting.  Even though I typically don't use an easel for my watercolor painting, I decided I'd try something new, and do a splatter abstract with the Watercolor paints.

I set the easel up outside and just started picking random colors and flicking them at the piece of paper.  It was a lot of fun, and I ended up with a pretty neat picture.


My favorite part of the picture is the blue at the top.  I decided to add some water to the paper before I splattered and the way the blue meshed with the water makes it look like a drop of water about ready to drip off the paper.


Friday, August 23, 2019

Trace, Ink & Paint - Bluebird

So, a few days ago at work, there were some scrap office supplies, and I was able to procure and undercabinet light.  It's about 4 ft long, and I thought it would be perfect as a light-box for doing some watercolor tracings.  I'm not the best by any means at drawing, so tracing is a good option for me.

I wanted to do a bluebird, so I found a very simple bluebird online and printed out out an outline.  Here is a picture of the undercabinet light, the outline, and then my tracing.

Here's the finished painting below.  I somewhat messed up the area around the throat.  I wasn't paying attention to the water and it bled a little bit.  Other than that, I'm pleased with the overall result.  The whole process of tracing and painting took maybe 35 minutes.  I cut the paper to 4"x6", so it should fit nicely in a frame.

Definitely much quicker and easier than the bluebird I had done before.

Hope you enjoy.

Thursday, August 15, 2019

Arteza Watercolor Brush Pens & Watercolor Paper

I started with Watercolors as I mentioned before, wanting to paint and color in some scenes for map sketches I was drawing.  I happened upon Arteza's Watercolor Brush Pens and purchased a set of 96 off of Amazon and I haven't been disappointed with them.

Click on the Image Below to see the set which I'm using.


Being new to Watercolor, I had watched some YouTube videos (see bottom of post) which were really helpful to get started.  One thing I didn't understand well enough the first time I started using them, was how important the paper is that you are painting on. I had purchased along with the Watercolor Brush pens, some mixed-media paper from Arteza as well, and assumed that would be fine.  That was not the case.  The brush pens act more like markers, and after applied dry, do not blend well on the mixed media paper.  I got very frustrated and figured I was doing something wrong; it looked so easy to blend these pens in the videos.  I later went out and bought some Watercolor paper and had a much easier time afterward using the brush pens.

Here is one of the first images I painted using the brush pens, it was of tulips I sketched.  You can see how the colors blended well.  I think this was even done on the mixed media paper...


As for the Pens themselves, they are very easy to use, either Wet on Wet, or Wet on Dry.  I have used them for coloring in adult coloring books as well and they work very nice.  The color range with the set of 96 is extensive, and frankly, the set of 24 or set of 48 could probably get you by just as well.  I have found that many of the colors are barely distinguishable from each other. I've linked to both of those sets here as well to save you time.


Arteza has some nice watercolor paper which I have linked below.  I will say that I have not specifically purchased this paper yet, but it is not the mixed media, which won't work as well if you are going to purchase the pens.  Be careful to make sure you are buying 140lb/300gsm Watercolor paper if/when you do.

Click on the Image Below to go directly to the Watercolor Paper


Overall, these are some good products to get you started.  They got me started and only led to me then purchasing further watercolor tube sets, pan sets, and more as I have gone along.  I'll post more on those later.

Links to YouTube Videos on Watercolor Brush Pen Tutorials.

-Rob

Wednesday, August 14, 2019

Red Spotted Purple Butterfly

This weekend, while out at our local state park, I took a picture of a Red Spotted purple butterfly.  Later that evening, I decided to try to paint this butterfly.  I'm wishing now that I had just left the background a plain color instead of trying to paint the leaf, but live and learn.  Additionally, I tried using some masking fluid around the wing tips in order to keep them white.  I must not have applied it correctly because I was having a hard time getting it off, so just left it on, which is why the wing tips look bluish, and not white.

Above is the original picture / inspiration piece.

I posted on Facebook and surprisingly got a lot of positive feedback, which was nice.  Obviously, there are things that can be improved, but I'll work on that as I go.

--Rob

Welcome

Welcome to my home for logging and blogging my new journey in watercolor painting.  My start in watercolor painting was about 3 months ago around my birthday and came as I wanted to find a way to color in some sketches I was doing.  I found some watercolor brush pens on Amazon, purchased those and therein began my journey.

I soon realized that I was enjoying the art and the challenge of watercolor, over my initial plan of just using the pens as markers.  I then went and purchased a set of tubes, then later a pan set.  I've now done close to 20-30 paintings on sizes from 9"x 12" down to bookmarks.

Over the course of this blog, I'll post some of the supplies I use, the things I've learned, and continue learning, as well as the paintings I've done.  Where applicable, I'll also post the inspiration for those paintings, so as to give credit to the original photograph or artist.  Much of my inspiration comes from things I see, pictures I take, or images others have taken.  I do plan on posting some affiliate content if relevant, merely to help replenish my supplies as I use them up.

I'm grateful for the positive words and support from friends and family, which encourages me to work on my skills.  My wife has gone so far as to buyout our local Meijer of all of their 9" x 12" frames so that she can frame some of my drawings and hang them around the house.

It's been a short, but fun journey thus far.  I've had many friends and family want to see some of the works I've done, and I thought this would be a way to help catalog those works as I go, and share them in case others would like to enjoy them as well.

The first step in any journey is to just take that first step.... well here it goes.

-- Rob

Creating Stunning AI-Generated Landscapes

Artificial Intelligence has revolutionized the way we create art, and landscapes are no exception. With the help of AI, it is now possible t...